
This is my entry to the Csadvent Calendar for this year Thanks Matt for this wonderful initiative. here we can find a collection of awesome articles from bloggers across the globe.
The translation is necessary for spreading new information, knowledge, and ideas across the world. It is absolutely necessary to achieve effective communication between different cultures imagine the live conferences when we do a presentation online or offline people have issues understanding the language of the speaker. Yes, there are plenty of options like a presentation translator that will convert the speech to the text we needed and people will be benefited from that. With this article, let’s try to build a translator which will be available on the browser it will translate the text into the various languages we will have and then it will broadcast the result to the browsers in real-time, Technology stack that we will be using for this will be Azure functions, Azure SignalR Service, Blazor and Azure cognitive services.
Architecture
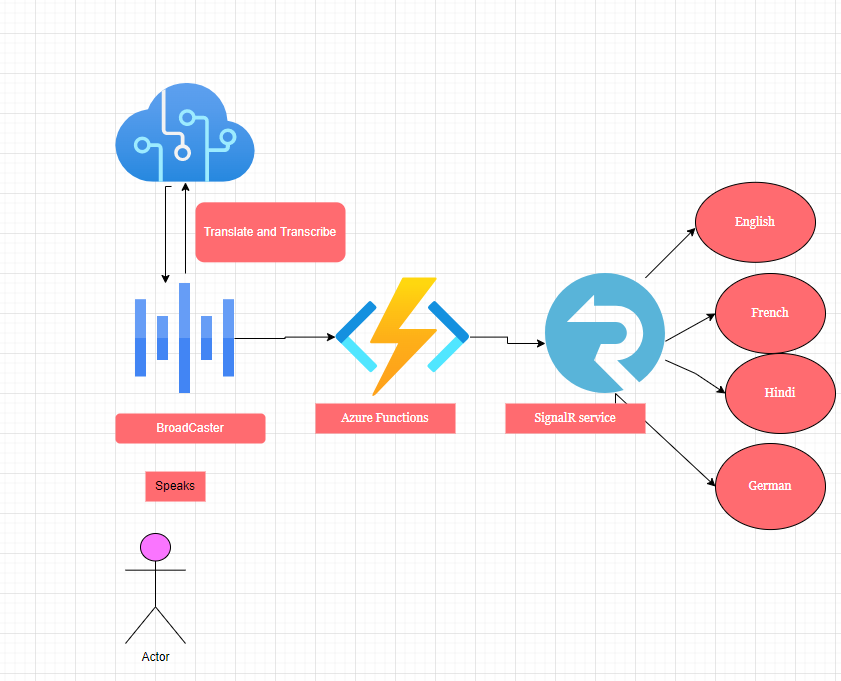
Basically, our app is divided into two parts first a console app which is a broadcaster and another one is the serverless Azure function along with the Azure SignalR service can send the real-time update to the Blazor Application which will show us the actual translations.
In this, our broadcaster which is a simple Console app that will do the heavy lifting of recognizing the speech and translation and send it over to the Azure function and from a there azure function using the output binding to the SignalR service send these translations to the browser app.
Create Azure resources
To achieve this, we need to create two Azure services first one is the Azure cognitive speech service and another one is the Azure SignalR service.
Let’s create the resources one by one first let’s see how to create the cognitive speech service

Now scroll down a bit and click on the option speech like below


In this section, we can select the region and the pricing tier we can use the Free tier which is available with some limits for our application
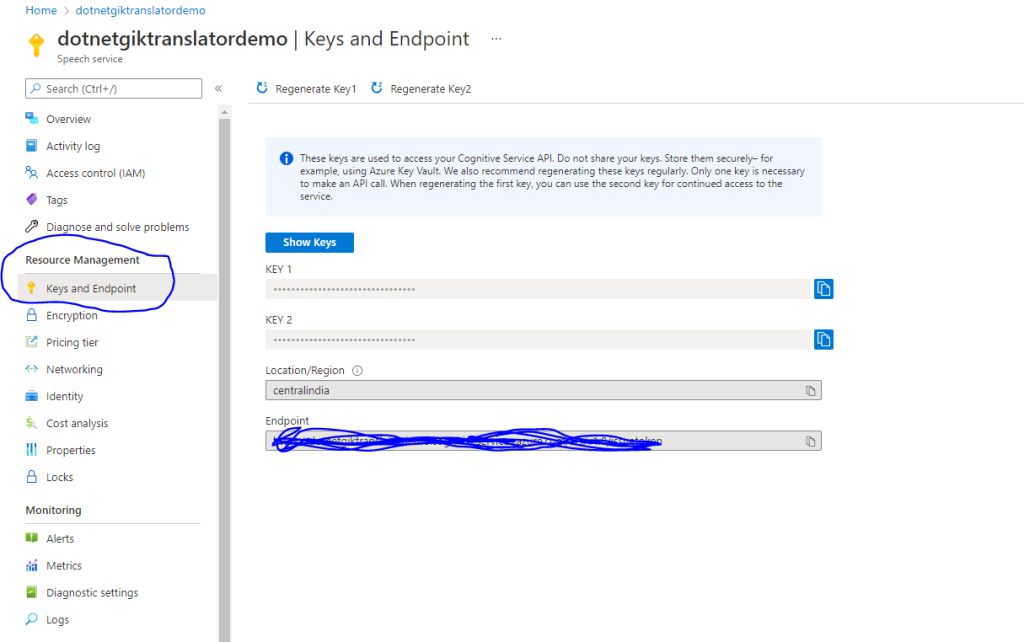
Once we have created the resources we need to get the Keys and endpoints for the same which we need to use in the broadcaster we can get them from here
ok now we are done with creating the speech service so far let us create the Azure SignalR Service
Create Azure SignalR service
To create the Azure SignalR service and its configuration you can follow this article here which will explain how to configure the SignalR service for the serverless mode
Once we have the azure services lets create the broadcaster using the Azure speech SDK for cognitive services for that let us add one console application and use the following code block
Create the Broadcaster App
To create the Broadcast App we will create the console application which will use the Azure SDK for speech and we will use the events provided by SDK to implement the translate and transcribe the things we will speak the code snippet for this is like below
using Microsoft.CognitiveServices.Speech;
using Microsoft.CognitiveServices.Speech.Audio;
using Microsoft.CognitiveServices.Speech.Translation;
using Newtonsoft.Json;
using System;
using System.Collections.Generic;
using System.Net.Http;
using System.Text;
using System.Threading.Tasks;

namespace TranslatorDemo
{
	class Program
	{
		static async System.Threading.Tasks.Task Main(string[] args)
		{

            var allowedTranslations = new List<string> { "en-US", "de-DE", "hi-HI", "bs-HR", "ro-RO", "mr-MR", "gu-GU" };
            try
			{
				// Create the Configuration for
				var config = SpeechTranslationConfig.FromSubscription("<Replace your key>", "<Replace your Region>");

				// Set the recognition lanaguage this will be the language of the speaker
				config.SpeechRecognitionLanguage = "en-US";

				foreach (var translation in allowedTranslations)
				{
					// So the language we need to add is like en,de,hi,ro
					config.AddTargetLanguage(translation.Split('-')[0]);
				}

				// Check the default microphone of the system
				using var audioConfig = AudioConfig.FromDefaultMicrophoneInput();

				// Create a recognizer
				using var translationRecognizer = new TranslationRecognizer(config, audioConfig);

				// Create a session with the recognizer
				translationRecognizer.SessionStarted += TranslationRecognitionSessionStarted;

				// Register the event to get the cancelled
				translationRecognizer.Canceled += TranslationRecognitionCancelled;

                //Register the event when the speech is recognized.
				translationRecognizer.Recognizing += async (s, e) => { await Recognizing(e, allowedTranslations); };

				do
				{
					await translationRecognizer.StartContinuousRecognitionAsync();

				}
				while (Console.ReadKey(true).Key == ConsoleKey.Enter);
			}
			catch (Exception e)
			{
				Console.WriteLine(e);

			}

            Console.WriteLine("Done");
		}

        private static async Task Recognizing(TranslationRecognitionEventArgs e, List<string> allowedTranslations)
        {
            Console.WriteLine("Translation recognized");

			// if the result is not translated don't execute this function

            if (e.Result.Reason != ResultReason.TranslatingSpeech) return;

            var translations = new Translations
            {
                RecognizedOffset = e.Result.OffsetInTicks.ToString(),
                AllowedLanguages = new Dictionary<string, string>()
            };


            foreach (var translationLangauage in allowedTranslations)
            {
                e.Result.Translations.TryGetValue(GetLanguageCode(translationLangauage), out string translation);


                translations.AllowedLanguages?.Add(translationLangauage.Split('-')[0], translation);
            }

            await SendTranslation(translations);

        }

        private static void TranslationRecognitionCancelled(object sender, TranslationRecognitionCanceledEventArgs e) => Console.WriteLine($"{e.ErrorCode} {e.ErrorDetails} {e.Reason}" );

        private static void TranslationRecognitionSessionStarted(object sender, SessionEventArgs e) => Console.WriteLine(e.SessionId);


        private static void Recognizer_SessionStopped(object sender, SessionEventArgs e) => Console.WriteLine(e.SessionId);

        private static string GetLanguageCode(string translationLanguage) => translationLanguage.Split('-')[0];

        private static async Task SendTranslation(Translations translations)
		{

            var data = new StringContent(JsonConvert.SerializeObject(translations), Encoding.UTF8, "application/json");

			const string url = $"http://localhost:7071/api/BroadcastTranslation";

            using var client = new HttpClient();

			await client.PostAsync(url, data);
		}

	}
}


public class Translations
{
	public string RecognizedOffset { get; set; }
	public Dictionary<string,string> AllowedLanguages { get; set; }
}
If we see the above code all the heavy lifting of the things will be done by the Speech SDK , right from recognizing the microphone to the translation and splitting the translation with proper offset .
So overall flow in this is
- Create the Configuration with our subscription details for the speech service
- Set the source language that we want to be translated
- Create and add the configuration for the allowed translated languages
- Register various events like session started and cancelled so that we will have the proper outputs on various steps
- When the translation happens we will post the data which we have to the Azure function
Design Azure functions
using Microsoft.AspNetCore.Http;
using Microsoft.AspNetCore.Mvc;
using Microsoft.Azure.WebJobs;
using Microsoft.Azure.WebJobs.Extensions.Http;
using Microsoft.Azure.WebJobs.Extensions.SignalRService;
using Newtonsoft.Json;
using Shared;
using System;
using System.Collections.Generic;
using System.IO;
using System.Linq;
using System.Threading.Tasks;

namespace ServerlessTranslator
{
    public static class Translator
    {
        [FunctionName("negotiate")]
        public static IActionResult Negotiate(
            [HttpTrigger(AuthorizationLevel.Anonymous, "Post", Route = "{userId}/negotiate")]
            HttpRequest req,
            [SignalRConnectionInfo(HubName = "translator", UserId = "{userId}")]
            SignalRConnectionInfo connectionInfo)
        {
            return new OkObjectResult(connectionInfo);
        }

        [FunctionName(nameof(UpdateLanguageSubscription))]
        public static async Task UpdateLanguageSubscription(
            [HttpTrigger(AuthorizationLevel.Anonymous, "POST")]
            dynamic payload,
            [SignalR(HubName = "translator")] IAsyncCollector<SignalRGroupAction> signalRGroupActions)
        {
            var languageCode = payload.languageCode.ToString();

            var allowedTranslations = new List<string> { "en", "de", "hi", "bs", "ro", "mr", "gu" };


            foreach (var translations in allowedTranslations)
            {
                var groupAction = languageCode == translations ? GroupAction.Add : GroupAction.Remove;

                Console.Write($"{groupAction} of {payload.userId} from group {translations}" + Environment.NewLine);

                await signalRGroupActions.AddAsync(new SignalRGroupAction
                {
                    UserId = payload.userId,
                    GroupName = translations,
                    Action = languageCode == translations ? GroupAction.Add : GroupAction.Remove
                });
            }
        }

        [FunctionName(nameof(BroadcastTranslation))]
        public static async Task BroadcastTranslation(
            [HttpTrigger(AuthorizationLevel.Anonymous, "POST")]
            HttpRequest req,
            [SignalR(HubName = "translator")] IAsyncCollector<SignalRMessage> signalRMessages)
        {
            var translationBody = await new StreamReader(req.Body).ReadToEndAsync();

            var translations = JsonConvert.DeserializeObject<Translations>(translationBody);

            var translationsTasks = (from language in translations.AllowedLanguages
                                         let translation = new TranslationsReceived()
                                         { Key = language.Key, Offset = translations.RecognizedOffset, Text = language.Value }
                                         select signalRMessages.AddAsync(new SignalRMessage
                                         { Target = "newTranslation", GroupName = language.Key, Arguments = new object[] { translation } })).ToList();


            await Task.WhenAll(translationsTasks);
        }


    }
}

public class Translations
{
    public string RecognizedOffset { get; set; }
    public Dictionary<string, string> AllowedLanguages { get; set; }
}
We have three azure functions first one being the negotiate function which we will use in the Blazor application to establish the connection , next is the function to update the language subscription for the user and another one is the one which will accept the translation from the broadcaster and outputs it to the Azure SignalR service lets see these funcctions one by one
- Negotiate function To start communication between client and Service we need a valid access token and a URL . In our case as we are using the Serverless configuration bindings we will need an Endpoint named as a “negotiate” which will return us the connection information .In this we have a Http Triggered function which has SignalRConnectionInfo as an input binding which will generate the token information
- UpdateLanguageSubscription
In this function we are using this to make sure that we send the translation to the receiver smoothly . for that pupose we will use the SignalR Groups which allows us to place the users in some groups in which we can target a message to the group instead of targetting them to the individual users , In this function we make sure that whenever user changes the language in the dropdown we will trigger this function and change the language group of that user.
3. BroadcastTranslation
This function receives the payload from the broadcast app ( console app ) which we have created , it contains the translated payload for the languages we have set in the console application and in this it also uses the output bindings of the SignalR service to send the data to the connected clients which wil be the Blazor app which we will see how can we create it and use it .
Client Application
For designing the actual UI we will use the Blazor server app for this you can follow my previous article on how to add the Blazor server app and add the razor components
in This lets first start by adding a Razor component we will call it the Translator in this we will have a simple UI with the dropdown to select the language and then we will have the section to get the translated text
so the UI code for the same will be like below
@using Microsoft.AspNetCore.SignalR.Client
@using System.Net.Http.Headers
@using System.Text
@using System.Text.Json.Serialization
@using global::Shared
@using Newtonsoft.Json

@page "/translator"

@inherits SpeechTranslatorBlazor.Translator


<h3>Translator</h3>


<select class="form-control" @onchange="LanguageChanged">
	<option value="">-- Select Language --</option>
	@foreach (var language in languageList)
	{
		<option value="@language">@language</option>
	}

</select>

<hr/>
<div class="card-deck">
    @foreach (var translatedText in Translations)
    {
        @translatedText.Value

	    <br />
    }
</div>
Now once we have the UI we will have the seprate code files which will have code like below
using Microsoft.AspNetCore.Components;
using Microsoft.AspNetCore.SignalR.Client;
using Newtonsoft.Json;
using Shared;
using System;
using System.Collections.Generic;
using System.Net.Http;
using System.Text;
using System.Threading.Tasks;

namespace SpeechTranslatorBlazor
{
	public class Translator : ComponentBase
	{
		readonly string UserId = Guid.NewGuid().ToString("N");

		[Inject]
		protected HttpClient Http { get; set; }

		protected Dictionary<string, string> Translations = new Dictionary<string, string>();

		public List<string> languageList = new List<string> {"en-US", "de-DE", "hi-HI", "mr-MR", "ro-RO", "bs-BS", "gu-GU"};

		private HubConnection HubConnection;

		public async Task ConnectToHub(string selectedLanguageCode)
		{
			HubConnection = new HubConnectionBuilder()
				.WithUrl($"http://localhost:7071/api/{UserId}") // Negotiate function Url
				.Build();

			Connect();

			await HubConnection.StartAsync();

			var languageSubscriptionData = new
			{
				languageCode = selectedLanguageCode,
				userId = UserId
			};


			var jsonContent = new StringContent(JsonConvert.SerializeObject(languageSubscriptionData), Encoding.UTF8,
				"application/json");

			await Http.PostAsync("http://localhost:7071/api/UpdateLanguageSubscription", jsonContent);
		}

		private void Connect()
		{
			HubConnection.On<TranslationsReceived>("newTranslation", (clientMessage) =>
			{
				Translations[clientMessage.Offset] = clientMessage.Text;

				StateHasChanged(); //This tells Blazor that the UI needs to be updated
			});
		}

		public async Task LanguageChanged(ChangeEventArgs e)
		{
			await ConnectToHub(e.Value.ToString().Split('-')[0]);
		}
	}
}
The code for the Blazor App can be summarized in following steps
- Connect to Hub
To establish the connection with the Azure SignalR service we use HubConnectionBuilder and call Build method the code for the same will be like below in this we need to provide the URL of the negotiate function here.
2. Register the Handler
In this case we will use the HubConnection On() method to register a handler which can be invoked whenever the hub method dashboard message is called Once this handler is registered, we can write the code which will be used to receive the message and then update the UI in this case it is our Connect method which will be our handler in which we write the code which tells that the translation has arrived and perform some action on it
3. Start the Connection
Once we have setup all the stuff now it is time to start the connection and initiate the communication with our SignalR service to start the connection we will use following code
Once we are done with the all the code and setup when we run the application we can see the output like below
References
https://azure.microsoft.com/en-in/services/signalr-service/


That demo at the end is dynamite. I love how little real plumbing there is to build out a service like this. Thanks for posting it.
LikeLike
[…] Real-time Speech Translator using Azure SignalR Service, Azure functions Azure Cognitive services an… (Mangesh Gaherwar) […]
LikeLike
[…] API with ETags & Hypermedia (Derek Comartin) Build Simple Timeline in React (Aleks Popovic) Real-time Speech Translator using Azure SignalR Service, Azure functions Azure Cognitive services an… (Mangesh […]
LikeLike
[…] Real-time Speech Translator using Azure SignalR Service, Azure functions Azure Cognitive services an… (Mangesh Gaherwar) […]
LikeLike